
Today, we will look at how to incorporate public datasets to improve our detections. We will create Sentinel watchlists, build rules around them and then automatically update these watchlists to keep our rules up to date with minimal effort.
For this, we will use a publicly available dataset which attempts to keep track of known C2 servers[1].
Now, to manage your expectations: the data we will be using is gathered on a best-effort basis, but is by no means complete. There will be C2 frameworks which are not detected by this feed, as well as implementations which are hidden sufficiently that they will not show up.
With that out of the way, let’s get started.
Creating the watchlists
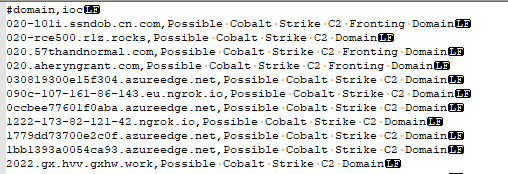
For this blog, we will be using the C2IntelFeeds[1] repository, published by drb-ra. First, download and extract this repository. We are interested in the following files for now:
- IPC2s-30day.csv
- domainC2s-20day-filter-abused.csv
Unfortunately, these files have their header prefixed with a # character.
The # character is not accepted for Sentinel watchlist headers. So open up the files with your favorite text editor and remove those # characters.
As a next step, create two watchlists[2] and upload the updated .csv files to them.
| Watchlist Name     | File Contents                     | SearchKey |
| ------------------ | --------------------------------- | --------- |
| C2IntelFeed-IP     | IPC2s-30day.csv                   | ip        |
| C2IntelFeed-Domain | domainC2s-30day-filter-abused.csv | domain    |
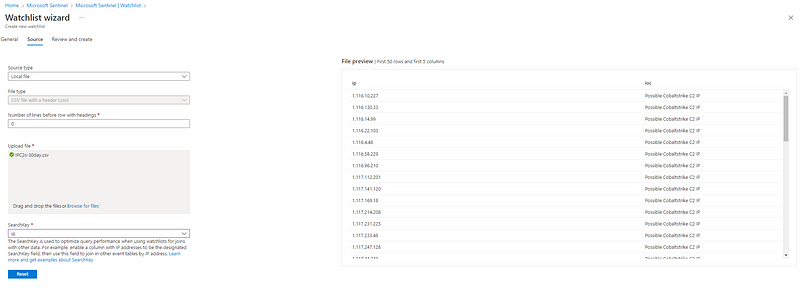
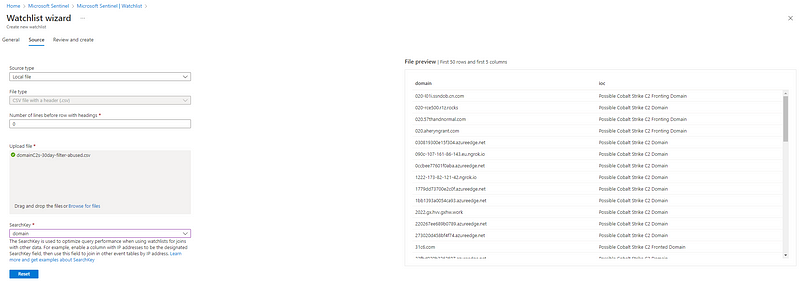
Once created, they should look something like this in the Sentinel watchlist overview:

Generating test data
Now we need some test-data. So from your MDE-onboarded test-machine try to connect to some of the IPs and domains in the lists.

Note that you will need to find a domain which still resolves to test the matching on domain names. Known C2 domains are prone to being taken down, so you may need to try a few.
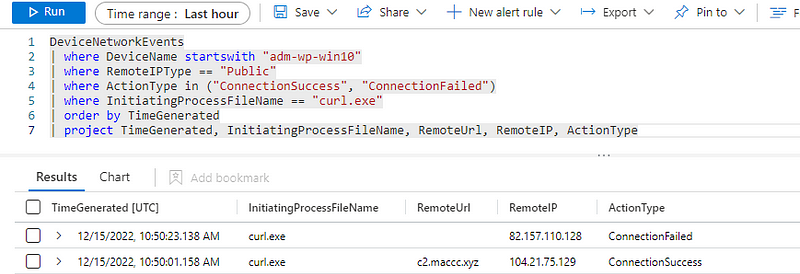
We can then start by creating a small, targeted search in Sentinel to find these records for our test machine, and use this data as a starting point to begin writing some rules.
DeviceNetworkEvents
| where DeviceName startswith "<your-test-machine-here>"
| where RemoteIPType == "Public"
| where ActionType in ("ConnectionSuccess", "ConnectionFailed")
| where InitiatingProcessFileName == "curl.exe"
| order by TimeGenerated
| project TimeGenerated, InitiatingProcessFileName, RemoteUrl, RemoteIP, ActionType
When running the above query in my test environment, results are popping up.
Building the detection rule — the over-engineered way
Now, to turn the two watchlists into detection rules, we have two options:
a) the easy way: just create two separate rules with one watchlist each, or;
b) the more difficult way: we create one rule for multiple watchlists.
Obviously, we are going for the more difficult b) option, and will create a single rule which we completely over-engineer. Feel free to jump to the “Building the detection rule, the easy and fast way” part of the blog, if over-engineering doesn’t interest you.
First, let’s start by copying the first part of the code from the earlier query above and removing the filter for the single computer:
DeviceNetworkEvents
| where RemoteIPType == "Public"
| where ActionType in ("ConnectionSuccess", "ConnectionFailed")
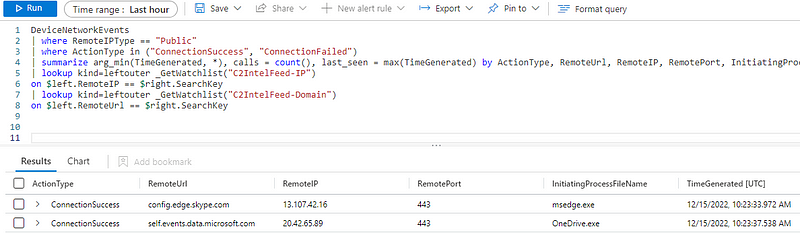
Now we have an overview of potential outbound connections. The overview may actually be a lot of records and we need to join them with two lists, so we can’t use inner-joins, but are stuck with outer-joins. Therefore, we need to clean this up a bit, while retaining useful metadata. We will keep the first record of an aggregated connection set, so we can keep the ReportID, etc., but also get an indication on the number of outbound connections and whether such connections are still ongoing.
| summarize arg_min(TimeGenerated, *), calls = count(), last_seen = max(TimeGenerated) by ActionType, RemoteUrl, RemoteIP, RemotePort, InitiatingProcessFileName
Now, we join the network connection records with the two watchlists we created earlier.
| lookup kind=leftouter _GetWatchlist("C2IntelFeed-IP")
on $left.RemoteIP == $right.SearchKey
| lookup kind=leftouter _GetWatchlist("C2IntelFeed-Domain")
on $left.RemoteUrl == $right.SearchKey
Note that we join on the ‘SearchKey’ field which we defined when creating the lists. This should increase query performance, as there should be an index on the SearchKey.
Another thing to note is that if no matches are found, no columns are added. This will be important a bit later, when getting rid of excess columns.
The query so far now looks like this:
DeviceNetworkEvents
| where RemoteIPType == "Public"
| where ActionType in ("ConnectionSuccess", "ConnectionFailed")
| summarize arg_min(TimeGenerated, *), calls = count(), last_seen = max(TimeGenerated) by ActionType, RemoteUrl, RemoteIP, RemotePort, InitiatingProcessFileName
| lookup kind=leftouter _GetWatchlist("C2IntelFeed-IP")
on $left.RemoteIP == $right.SearchKey
| lookup kind=leftouter _GetWatchlist("C2IntelFeed-Domain")
on $left.RemoteUrl == $right.SearchKey
However, it currently returns all attempted network connections. Even though a match may have been made on the domains or IPs, it has not been filtered yet.
Matches work in such a way that only if there is some match, columns are added to the entire dataset. In this case, the column ioc is of most interest to us. However, if no match was made, the column is not added. Furthermore, columns cannot have duplicate names. This means that if matches are found in both lists, an ioc and ioc1 column will be added.
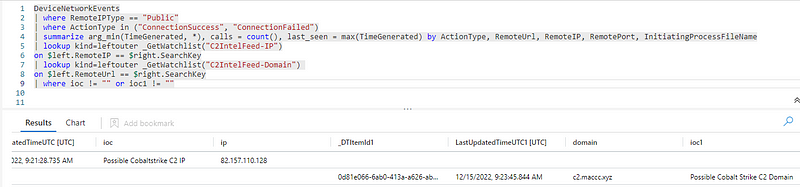
But if no matches are found, no columns are added. This means that the query above only works if C2 traffic was found to both a malicious IP and a malicious domain. To get around this, we can build our own ioc column, with the help of the function ‘column_ifexists()’.
| extend ioc = trim(";",strcat(column_ifexists("ioc", ""),";",column_ifexists("ioc1", "")))
The line above will:
- [extend ioc] => create or overwrite the ioc column.
- [trim(“;”,…)] => trim leading or trailing “;” characters, if we only have one IoC on a line.
- [strcat(…,”;”,…)] => concatenate the various IoCs we may have with a “;” in between.
- [column_ifexists(“<columnname>”,””)] => returns the value if the column exists; otherwise returns the empty string “”.
In effect, the above tries to see if any IoCs exist on a line, and concatenate them with a ‘;’ in between if both the IP and the domain match.
If only one IoC exists, only the IoC will be printed without the ‘;’ character.
If no IoC exists, the column will have the empty string “”.
Now, we can comfortably filter on the ioc column.
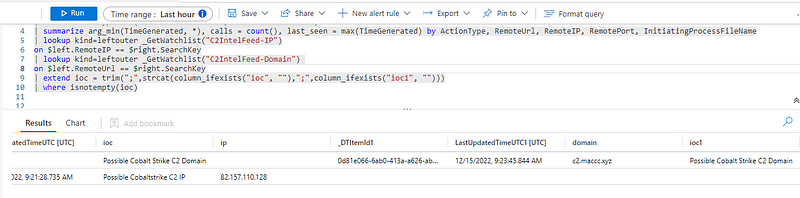
We can now see that the column ioc always holds the IoC, if any is found.
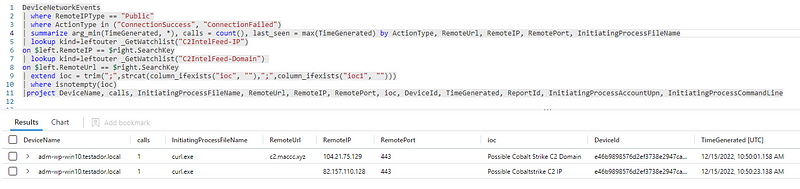
If you want to get rid of the other optional columns (like ip, domain, DTItemId, etc.) to clear up the results from excess and duplicate data, we can either:
- Make sure they exist and use project-away to get rid of them:
| extend ioc1 = "", ip = "", domain = "", _DTItemId = "", LastUpdatedTimeUTC = "", _DTItemId1= "", LastUpdatedTimeUTC1 = ""
| project-away _DTItemId, LastUpdatedTimeUTC, _DTItemId1, LastUpdatedTimeUTC1, ip, domain, ioc1
- Or only project the fields we want to keep, for example:
|project DeviceName, calls, InitiatingProcessFileName, RemoteUrl, RemoteIP, RemotePort, ioc, DeviceId, TimeGenerated, ReportId, InitiatingProcessAccountUpn, InitiatingProcessCommandLine
So in totality, your rule could look something like this:
DeviceNetworkEvents
| where RemoteIPType == "Public"
| where ActionType in ("ConnectionSuccess", "ConnectionFailed")
| summarize arg_min(TimeGenerated, *), calls = count(), last_seen = max(TimeGenerated) by ActionType, RemoteUrl, RemoteIP, RemotePort, InitiatingProcessFileName
| lookup kind=leftouter _GetWatchlist("C2IntelFeed-IP")
on $left.RemoteIP == $right.SearchKey
| lookup kind=leftouter _GetWatchlist("C2IntelFeed-Domain")
on $left.RemoteUrl == $right.SearchKey
| extend ioc = trim(";",strcat(column_ifexists("ioc", ""),";",column_ifexists("ioc1", "")))
| where isnotempty(ioc)
|project DeviceName, calls, InitiatingProcessFileName, RemoteUrl, RemoteIP, RemotePort, ioc, DeviceId, TimeGenerated, ReportId, InitiatingProcessAccountUpn, InitiatingProcessCommandLine
Note that the performance of this query probably isn’t great.
Building the detection rule, the easy and fast way
As you can see, we needed to do quite a bit of ‘magic’ to make sure we could match with both lists, and then also clean up the results. This can be done far easier and with better performance by creating two individual rules which each attempt to match against a single list. Let’s take the domain watchlist as an example.
We can now use the inner-join, which saves us a lot of hassle. The inner-join allows Sentinel to match and filter without needing to create in-mem tables for the outer-joins, etc.
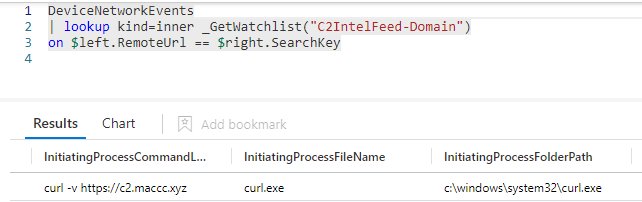
As you see, we immediately get the event we are looking for.
Now, all that’s left is some cleaning up of the excess columns, and some reordering if we like, and that’s it.

So, for both the domain and IP watchlists, the separate rules are as follows:
DeviceNetworkEvents
| lookup kind=inner _GetWatchlist("C2IntelFeed-IP")
on $left.RemoteIP == $right.SearchKey
| project-away _DTItemId, LastUpdatedTimeUTC, ip
| project-reorder DeviceName, InitiatingProcessFileName, RemoteUrl, RemoteIP, RemotePort, InitiatingProcessCommandLine
DeviceNetworkEvents
| lookup kind=inner _GetWatchlist("C2IntelFeed-Domain")
on $left.RemoteUrl == $right.SearchKey
| project-away _DTItemId, LastUpdatedTimeUTC, domain
| project-reorder DeviceName, InitiatingProcessFileName, RemoteUrl, RemoteIP, RemotePort, InitiatingProcessCommandLine
Point of note is that for these separate rules, each logged connection will result in a hit. So you may want to group these as part of your Sentinel alert configuration, for example by host.
Keep in mind that Defender does not log every individual connection attempt. It will usually log initial attempts, but subsequent attempts from the same process to the same host may not be logged repeatedly. So even though you may only see a couple of connections from any given process, there may be many more. They are simply not logged to limit the amount of logged data. This means you may want to check the logs on, for example, firewalls or outbound proxies to ascertain the exact number of requests and/or data hitting these malicious IPs.
Automating feed updates — setting up the logic app
Now, since we are using a feed which regularly updated, we would like to also automatically update our watchlists. We can do this with relative ease using an Azure Logic App [3][4].
So start by creating a new Azure Logic App and head over to the resource.

If you are faced with the tiling ‘Logic App Designer’, feel free to hit the ‘X’ on the top-right so we can do some configuration first.
On the overview page, ensure it has an Integration Account [5] set up in the ‘Workflow Settings’ of the logic app.
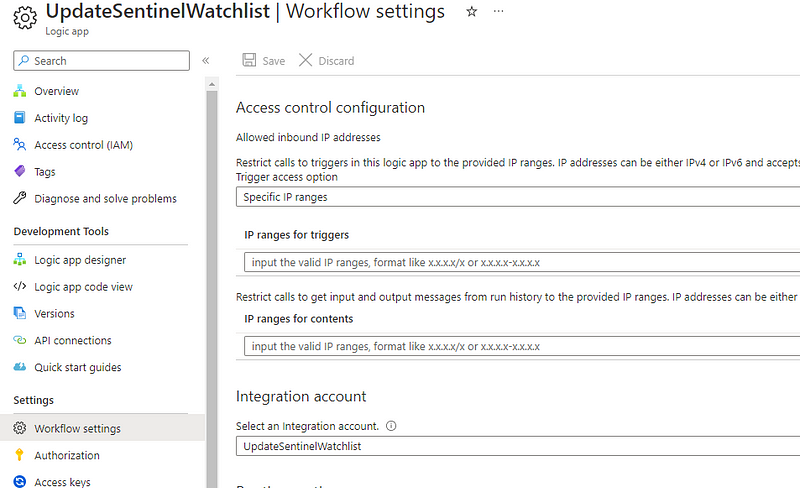
If you decide to allow-list IPs as above, make sure to temporarily add your IP to ‘IP ranges for content’ for debugging.
Now, set up the authorizations for this workflow. The authorization will depend on your environment and organization requirements. In this case, we will enable the system-assigned managed identity.
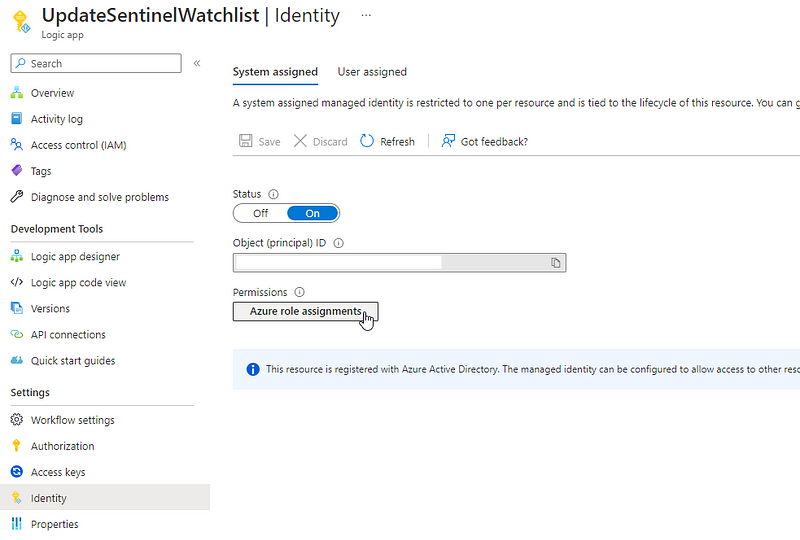
Assign it the following role:
| Scope          | Resource Group            | Role                           |
| -------------- | ------------------------- | ------------------------------ |
| Resource Group | <Sentinel resource group> | Microsoft Sentinel Contributor |
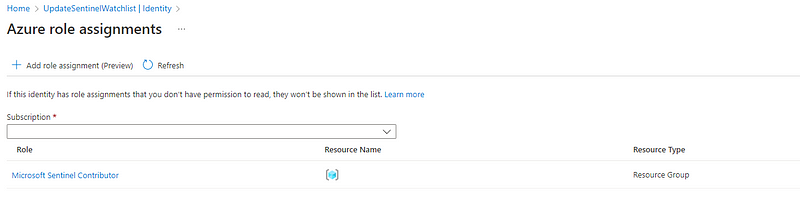
Obviously, the ‘Microsoft Sentinel Contributor’ role is somewhat sensitive, so make sure your properly secure the logic app itself, as is appropriate for your organization.
Creating the logic in the logic app
Now, hit ‘Edit’ on the overview page of the logic app to start building your logic app.

Make sure you have a clean logic app (you can select ‘blank logic app’ from the templates if you already messed around).

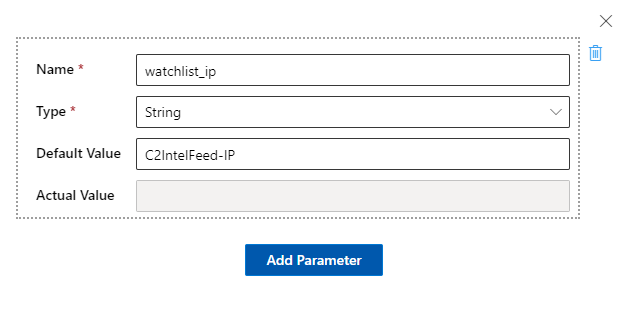
We are going to start by adding some parameters we will use later.
Click on [@] Parameters and configure the following parameters:
| Name                    | Type    | Default Value                                                                                                                                                                                                |
| ----------------------- | ------- | ------------------------------------------------------------------------------------------------------------------------------------------------------------------------------------------------------------ |
| subscriptionID          | String  | <ID of your Azure Sentinel subscription>                                                                                                                                                                     |
| resourceGroup           | Strring | <Name of your resource group>                                                                                                                                                                                |
| workspaceID             | String  | <ID of your Sentinel workspace>                                                                                                                                                                              |
| ip_watchlist_name       | String  | C2IntelFeed-IP                                                                                                                                                                                               |
| domain_watchlist_name   | String  | C2IntelFeed-Domain                                                                                                                                                                                           |
| ip_watchlist_url        | String  | [https://raw.githubusercontent.com/drb-ra/C2IntelFeeds/master/feeds/IPC2s-30day.csv](https://raw.githubusercontent.com/drb-ra/C2IntelFeeds/master/feeds/IPC2s-30day.csv)                                     |
| domain_watchlist_url    | String  | [https://raw.githubusercontent.com/drb-ra/C2IntelFeeds/master/feeds/domainC2s-30day-filter-abused.csv](https://raw.githubusercontent.com/drb-ra/C2IntelFeeds/master/feeds/domainC2s-30day-filter-abused.csv) |
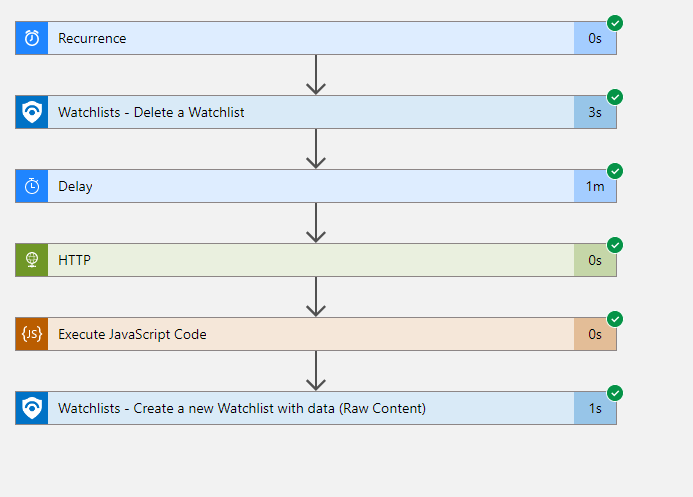
After adding the parameters, start building the flow. Start by creating a recurring trigger under Built-In -> Schedule.
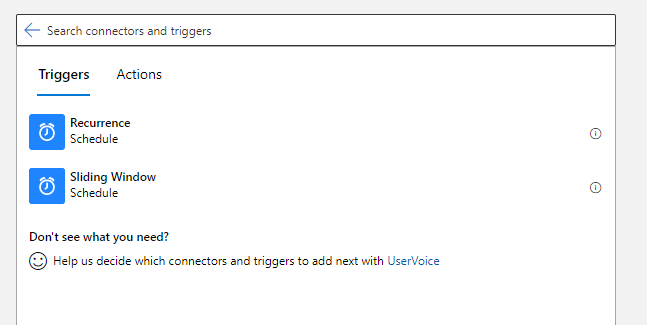
Set it to run, for example, every 6 hours.
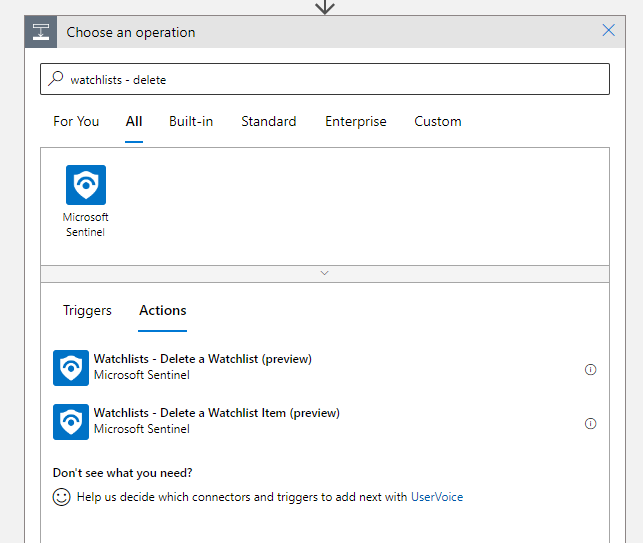
Unfortunately, the actions do not support a bulk-update of the list, so we will start with removing the list, and then recreating the list with new data.
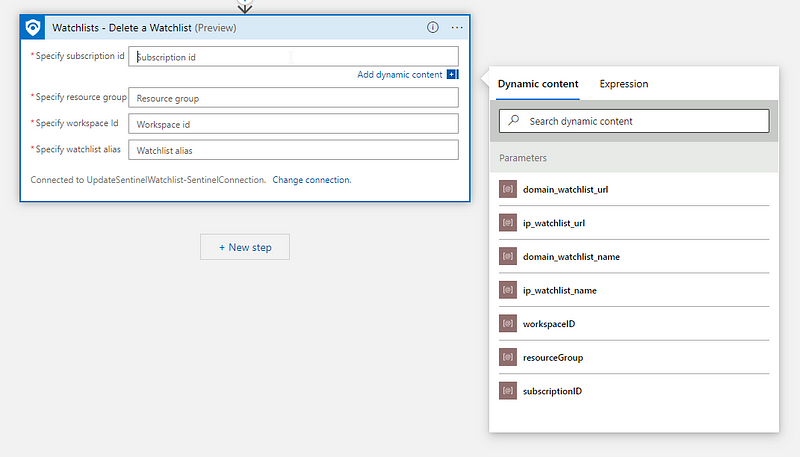
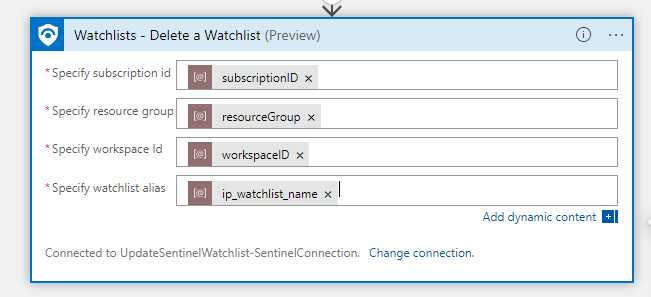
Add the Sentinel action ‘Watchlists — Delete a Watchlist (preview)’.
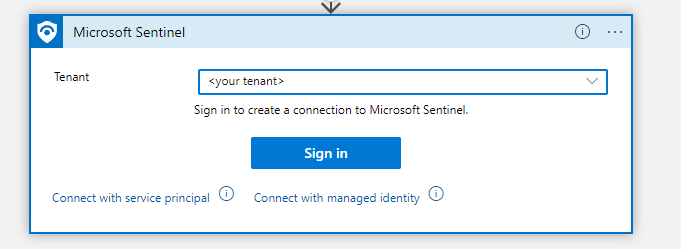
When asked, select your tenant and click ‘connect with managed identity’.
Enter a name for your connection which fits your organization’s naming convention and click ‘create’. This will create the API connection in the Logic App.
Now, populate the action with the parameters we just set. We will start with the IP watchlist.
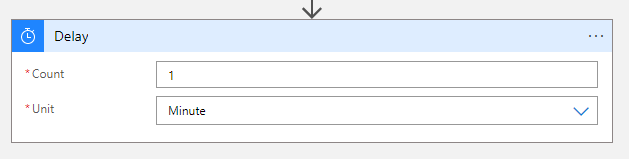
Now, this ‘delete watchlist’ action is asynchronous, so let’s give Sentinel a minute to actually remove the watchlist. Add the built-in action ‘Delay’ action and set it to 1 minute.
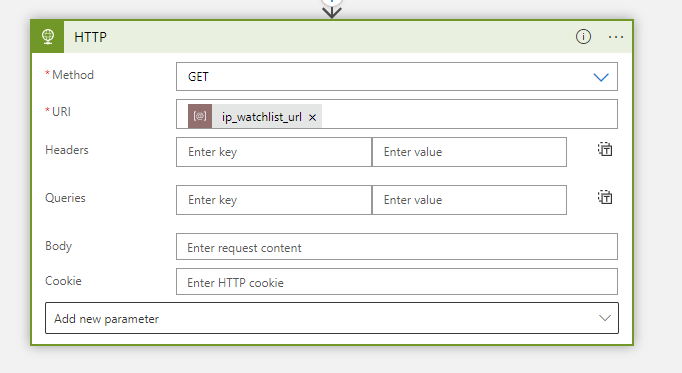
Next, retrieve the new list with suspicious domains and IPs using the ‘HTTP’ action and the GET verb.
Remember how in the beginning we had to remove the leading ‘#’ from the watchlist? We still need to do that, but now in the automation flow.
Add the ‘execute javascript code’ action, clear the field, and on the right click ‘see more’ and select the HTTP Body
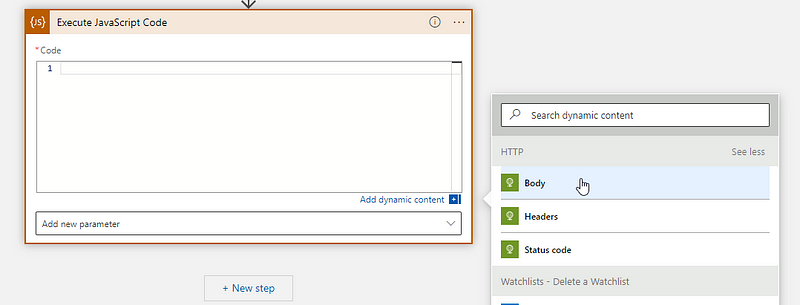
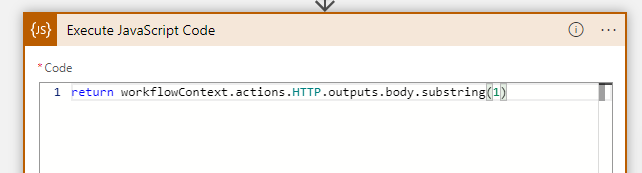
Prepend ‘return’ and add ‘.substring(1)’ at the end.
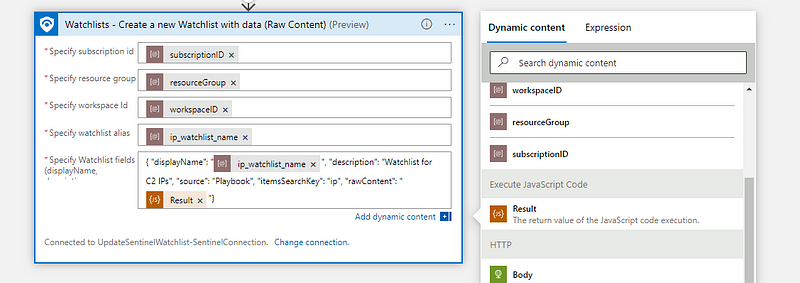
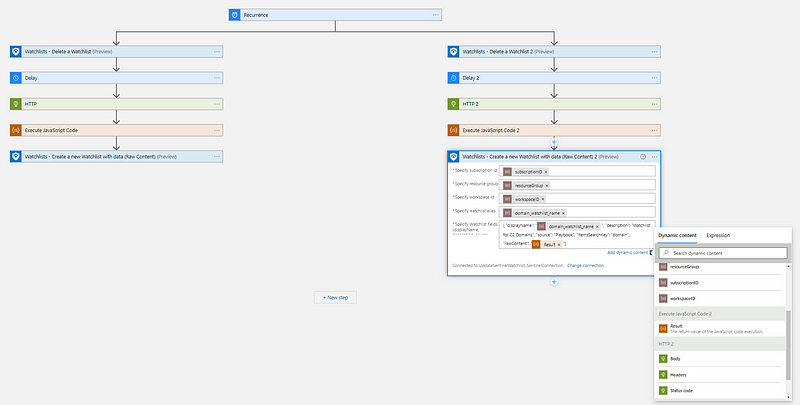
Now, let’s use this data to create a new watchlist. Add the Sentinel action ‘Watchlists — Create a Watchlist with data (Raw Content)’
Populate the fields and paste the following into the ‘JSON’ field:
{ "displayName": "", "description": "Watchlist for C2 IPs", "source": "Playbook", "itemsSearchKey": "ip", "rawContent": ""}
Next, embed the name of the watchlist, along with the contents of the watchlist.
The flow for the IP watchlist is complete and you can test it through the ‘run trigger’ action.
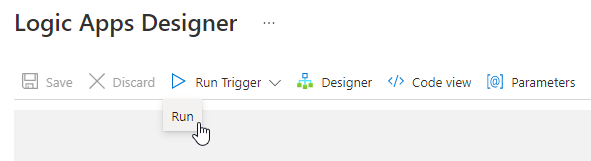
A proper run should return all green checks. You can examine the output per step by clicking the individual boxes.
If you get an orange check on the ‘delay’ step and/or are unable to check the output of steps with an ‘unauthorized’ error, your IP is not authorized to examine the output of jobs. Check the IP settings on the ‘Workflow Settings’ page and make sure your IP is authorized to access job contents.
You should be able to see the updated watchlist in your Sentinel watchlists. The ‘Created time’ should match the last run of your logic app.

To also update the domain watchlist, add a parallel step under the ‘recurrence’ trigger and repeat the steps above for the ‘domain’ list.
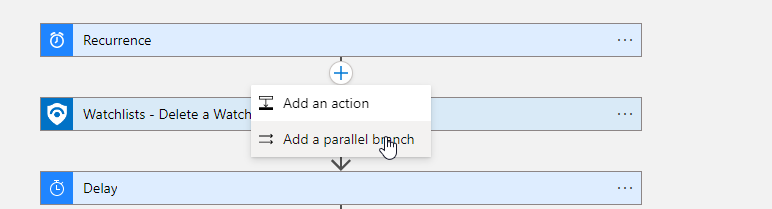
Remember to use the correct fields for the domain list, and to update the JSON for the watchlist creation accordingly (to use the column ‘domain’ as ‘itemSearchKey’).
Congratulations, your watchlists are now being updated with the latest data!
Please keep in mind that this is a minimal logic app without error handling. For example, you could think about what should happen if the repository cannot be reached. Perhaps you want to check that first before deleting the old watchlist.
Also note that you should probably make a more restrictive RBAC role to manage watchlists. However, that is beyond the scope of this blog.
Conclusion
Today we have looked at how we can use external data feeds to enrich our monitoring capability. We showed how to over-engineer rules, and how you can save yourself a lot of headaches by simply splitting complex rules into smaller rules. Lastly, we have looked at how to set up an Azure Logic App to interface with Sentinel and created the logic to periodically update the watchlist based on the latest available data.
Keep in mind that this blog mainly focused on the practical points of deploying these functionalities. Please talk to your local Azure admins to make sure any deployment, logic apps, etc. you create are in line with your organization’s security policies.
We are looking to expand the FalconForce team with enthusiastic, skilled detection (automation) engineers. Have a look at our job offerings and connect with us via [email protected].
Want to have access to our repository with over 350 advanced detections? Please have a look at our commercial offering and reach out via [email protected].
References
[1] https://github.com/drb-ra/C2IntelFeeds
[2] https://learn.microsoft.com/en-us/azure/sentinel/watchlists-create
[4] https://learn.microsoft.com/en-us/connectors/azuresentinel/#watchlists—add-a-new-watchlist-item
Knowledge center
Other articles

FalconFriday: Need for Speed: going underground with near-real-time (NRT) rules – 0xFF26
[dsm_breadcrumbs show_home_icon="off" separator_icon="K||divi||400" admin_label="Supreme Breadcrumbs" _builder_version="4.18.0" _module_preset="default" items_font="||||||||" items_text_color="rgba(255,255,255,0.6)" custom_css_main_element="color:...

How data science can boost your detection engineering maintenance and keep you from herding sheep
[dsm_breadcrumbs show_home_icon="off" separator_icon="K||divi||400" admin_label="Supreme Breadcrumbs" _builder_version="4.18.0" _module_preset="default" items_font="||||||||" items_text_color="rgba(255,255,255,0.6)" custom_css_main_element="color:...

Microsoft Defender for Endpoint Internal 0x06 – Custom Collection
[dsm_breadcrumbs show_home_icon="off" separator_icon="K||divi||400" admin_label="Supreme Breadcrumbs" _builder_version="4.18.0" _module_preset="default" items_font="||||||||" items_text_color="rgba(255,255,255,0.6)" custom_css_main_element="color:...

FalconForce realizes ambitions by working closely with its customers in a methodical manner, improving their security in the digital domain.
Energieweg 3
3542 DZ Utrecht
The Netherlands
FalconForce B.V.
[email protected]
(+31) 85 044 93 34
KVK 76682307
BTW NL860745314B01