
Being hackers at FalconForce, we are a bit paranoid by nature and by professional deformation. Every piece of IT we use (COTS or self-built), we aspire to make as secure and as hardened as possible. At FalconForce, we use Office365 for “day-to-day” office work and obviously, we tried configuring it as securely as possible.
Out of the box, Office 365 security is fairly good. I’m not aware of any public (serious) vulnerabilities in the past on the platform. However, also Microsoft has to make the trade-off between security and usability. And although I’m overall fairly happy with (almost) all choices they made for the general public, it wasn’t secure enough for us.
So early January, when we started FalconForce, I’ve set out to harden our Office 365 instance as much as we deemed fit. I was expecting to find plenty documentation, but was disappointed a bit. Although there was a lot of “guides” on hardening Office 365, most barely scratched the surface. Also, the official Microsoft documentation was nice, but not as elaborate as I hoped for. So I’ve documented all the changes we made to a vanilla Office 365 instance. Most of the changes are not direct mitigations of any security issue, but are aimed at attack surface reduction.
Since the number of changes made is extensive, and some features require additional licenses, I’ll split this article in three parts.
· Part 1 — Hardening a vanilla Office 365 (this blog).
· Part 2 — Setting up monitoring on Office 365.
· Part 3 — Even more improvements with paid features.
Part 2 and part 3 will follow later.
So let’s get started with the content. To keep things a bit readable, I’ve categorized the changes in the following buckets:
· Identity and Access Management.
· Attack surface reduction.
· Exchange.
· Sharepoint & OneDrive.
I’m assuming that you are fairly acquainted with the Admin environment of Office 365 and with Azure AD. Also, this is not a point-and-click guide. I’ve just highlighted my recommendations and I’m fully aware that not everything may be a workable trade-off in your organization. You need to perform your own risk analysis and make your own choices.
By the way, I know I’m exposing our Office 365 security settings for a large part and making the recon job for a potential attack way easier. But we consider it’s worth the trade-off, moreover, we rely heavily on monitoring on top of all the hardening to keep our environment secure. So no need to point this out 😉 I realize it and it’s a calculated risk in helping organizations protecting their Office365 environments.
A final note; Microsoft is deploying changes to the UI fairly frequently and buttons, labels and menu items tend to change fairly regularly. If you can’t find something on the exact spot as I’ve described, look around.
Identity and Access Management
Enforce MFA The most obvious of all improvements on Office 365 is to enforce MFA/2FA for all users. I highly recommend everybody to enforce MFA for all users. In the admin panel, go to Settings => Settings => Azure MFA. Select all users and click on “Enforce MFA”. The direct link to this page at the moment of writing is https://go.microsoft.com/fwlink/?LinkId=279980&culture=en-US&BrandContextID=O365. The MFA application used doesn’t impact security as far as I’m aware, but when using Microsoft Authenticator you can get the convenient push messages.
Enforce modern authentication Microsoft introduced a more secure way for authentication a couple of years ago. You want to enforce this so only clients implementing modern authentication can connect to your Exchange/Skype. In the admin panel, go to Settings => Settings => Modern Authentication and enable modern authentication.
Use separate admin account Next, create separate, unlicensed accounts for admin purposes. You don’t want your day-to-day office account to be an admin user. It’s already bad enough if someone grabs your normal accounts and accesses your info. You don’t want your admin account to be compromised as well. I recommend to have at least two personal admin accounts without access to other Office 365 apps. Having at least two admin accounts is for business continuity purposes. You don’t want to lose your admin access because of lost MFA token, forgotten password or …. And of course, don’t forget to enable MFA on those admin accounts as well.
Notification on password reset (for admins) This one doesn’t need a real explanation I guess. Just enable it 😉 There is no downside, only upsides. Go to Azure AD => Password reset => Notifications. There, set the “Notify all admins when other admins reset their password?” to yes. And while at it, set “Notify users on password resets?” to yes as well. This feature is a bit weird, because you lose access to your email once someone changes your password, but I guess in those obscure cases your users have setup an alternate email address, they’ll get a notification there.
Enforce mobile app code for password reset This option is meant to make self-service password resets a bit more secure. I’ve personally disabled self-service password, but in case you have it enabled, it prevents one obscure attack with the Microsoft Authenticator app. The attack works if someone’s phone is stolen but locked. The Microsoft Authenticator app allows you to approve a sign-in without unlocking the phone. So if an attacker tries a password reset with a stolen phone and your settings allow the user to authenticate with only a push message, you have a problem. Long story short, go to Azure AD => Password reset => Authentication methods and set the settings as follows:
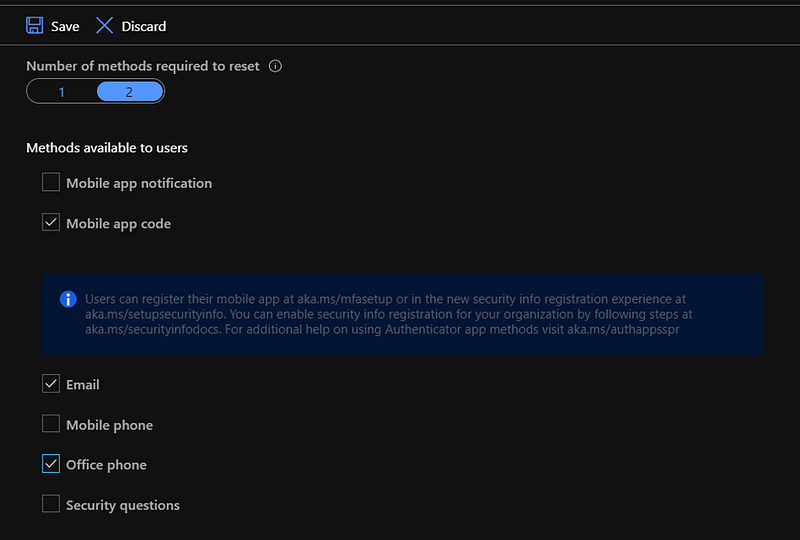
Most important is to disable the “Mobile app notification” method for authentication with password resets. AAD unfortunately requires you to select at least 3 options. In the stolen phone scenario, the “mobile phone” authentication can easily be bypassed as all phones allow to take phone calls while locked. In my threat profile, the “office phone” is harder to obtain access to. But mostly, I’m relying on either the “mobile app code” or “email” to safeguard users. In theory you can enable “office phone” and don’t fill in a office phone, but I haven’t tested this.
Disable self-service password reset For a small startup such as ours, it’s worth the trade-off to disable the self-service password resets. I would even claim that for any company with less than 100 users, it’s worth the trade-off. In case someone has forgotten his password, they can call me or one of the other admins for a password reset. I’m happy to spend 5 mins every now and then for this added security benefit. Go to Azure AD => Password reset => Properties and set “Self service password reset enabled” to “None”.
Restrict access to Azure portal By default, all your users have read access on the Azure portal. They can read the objects in AAD to which they have access to. This would for example be their own user info and probably some other stuff. If you think this is undesirable, you can disable it. In Azure AD go to User Settings and set “Restrict access to Azure AD administration portal” to yes. However, note that his is not a security feature. The same level of access is still possible with powershell. It’s just to prevent accidental use I guess. And again, we’re doing Attack Surface Reduction (ASR), so this helps just a tiny bit.
Bonus — Disable SMS/Phone 2FA: This options is actually very hard to find but Microsoft does allow you to disable SMS and “calling” as 2FA methods. I couldn’t find a way to navigate to this URL using the normal UI. In the end, I found the URL from a screenshot in the Microsoft documentation. Go this this URL: https://account.activedirectory.windowsazure.com/usermanagement/mfasettings.aspx and uncheck the “text message” and “call to phone” option. Using 2FA tokens or push messages is imo way more secure than sms/calling.
Attack surface reduction
By far the biggest category of this post is attack surface reduction (ASR). In a way, a lot of suggestions in this post can be piled under ASR. So this is a catch-all for ASR tricks which didn’t fit in another category.
Disable unused apps The most straightforward way of ASR is to disable all the Office 365 applications which you don’t use in your organization. And this might be a lot in some cases. I’ve personally disabled the following apps, but you can tune this list to your needs:
· Kaizala
· Yammer
· Sway
· PowerBI
· Forms
· StaffHub
· Stream
· Delve
· MyAnalytics
This list is just for illustration purposes. Disable all the apps you don’t use. The easiest way to revoke some apps, is by revoking the licenses for all users (or those who don’t use it). However, some apps are more integrated into O365 and cannot be disabled with licenses. Yammer is one example. For those apps, you need to disable login through the Azure AD portal. Go to Azure AD => Enterprise Applications => All Applications => Select “Microsoft Applications” for application type and click apply => Scroll down to and click the application you want to disable => Properties and set “Enabled for users to sign-in to No.
Disable external sharing If you think you have an increased threat profile, I’d suggest to disable external sharing. External sharing makes it possible for users to share files with users outside of your Office 365 organization. The issue I have with this feature, is that it’s very user-friendly to share information externally. Too user friendly, so someone can accidently something without realizing it. I’ve seen it happen a couple of times before, especially with non-tech people. However, this is a very big trade-off. Consider this risk for your organization, as well as the usability it offers. I prefer to have a another (cloud) service for external file sharing. There are plenty available, although I don’t want to mention specific names. In the admin panel, go to Settings => Settings => Sharepoint and set the sharing option to “Only people in your organization”.
Disable external group membership Similar to the previous one, it’s very easy to (accidently) add an external user to an internal group. To prevent such accidental mistakes, I don’t want any external user in our Office 365 environment. In the admin panel, go to Settings => Settings => Office 365 Groups and uncheck both checkboxes which allow external users in groups.
Disable Sway sharing If you haven’t disabled Sway because you’re using it, prevent external sharing for the same reasons again. In the admin portal, go to Settings => Settings => Sway and uncheck all boxes for external sharing.
Disable calendar sharing We all know that calendars sometimes are a nice side-channel for confidential information. I’d like to disable calendar sharing with external users to prevent users from (accidently) sharing their calendar with a client or with the significant other. In the admin panel, go to Settings => Settings => Calendar => and disable the checkmark next to “Let users share their calendars with people outside of your organization.” Of course, make sure to facilitate calendar sharing with externals in another way if your users need it.
Disable third-party apps access Office by default allows users to provide third-party apps access to your Office 365. This is only after the user has given consent. If you don’t know what I’m talking about, it’s this screen which is prompted to the user:
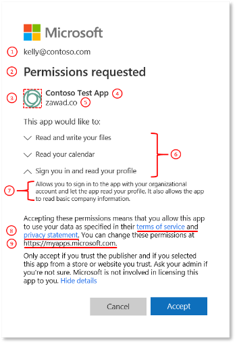
The issue I have with this option is that most users don’t realize what they’re doing if they accept this permission request. So they just click accept to make sure they can do whatever they we’re doing. Any user that wants to connect a third-party app to our environment, I want to know personally before allowing. In the admin panel, go to Settings => Settings => Integrated Apps => and disable the checkbox which says “Let users in your organization decide whether third-party apps can access their information”. Weirdly enough, there are other places where this settings can be set. I don’t know the exact difference and how those settings work together for third-party apps, but I’ve just disabled them all. The other locations are:
1. Go to Azure AD => Enterprise Applications => User Settings and set “Users can consent to apps accessing company data on their behalf” to no. And while at it, review the other settings on this page and set those to no if you agree.
2. Go to Azure AD => User Settings and set “Users can register applications” to no.
3. Go to Admin portal => Settings => Settings => User owned apps and services and uncheck both boxes.
If you don’t have a “greenfield” environment and want to check if someone has already connected a third-party app to your Office 365 environment, go to Azure AD => Enterprise Applications. There, set the Application type to “Enterprise applications” and the other two filters on any. Click apply and check if you recognize all the apps. Ideally, this list should be fairly short. The only exception I allowed so far, is the “iOS Accounts” which is the iPhone mail client in our case.
Disable MS Graph Connect This one is similar to disabling unused apps, but has more impact on your environment. By disabling graph connect, you cut the direct tie between Office 365 and Azure applications. I’d like to disable it, to prevent malicious Azure apps from snooping Office 365 data. Although I’m fairly convinced that a malicious app would have another way to get to that data, the bigger picture is ASR so let’s disable it. In the admin panel, go to Settings => Settings => Microsoft Graph Data Connect and disable the checkbox.
MFA for joining devices Enrolling new devices to the AAD account (this is similar to logging in to new devices from an app) is a sensitive action. In order to do so, users do need to authenticate with MFA. If you have MFA enforced by default, this setting changes nothing. But if you don’t have MFA enabled for all logins for whatever reason, this requires MFA for enrolling new devices. In Azure AD go to Devices => Device Settings and set “Require MFA to join devices” to yes.
Disable LinkedIn account connection Azure AD allows users to connect their LinkedIn profile to their account. Although I’m not completely sure what this exactly does, it does smell like unnecessary attack surface to me. I’d recommend to disable it, unless you have a solid reason to use it. On Azure AD, go to User Settings and set “LinkedIn account connection” to no.
Enable security defaults Microsoft has an option called “Security defaults” on Azure AD which is not enabled by default… Go figure. Anyway, it’s well worth to enable these security defaults. On Azure AD, go to Properties and scroll all the way down. There is a link “Manage security details” on the bottom of the page. Click it and set the “Enable Security Defaults” to yes on the pane. Most of the things are already covered in this blog post, but doesn’t hurt to enable it. Makes your setup future proof. The exact changes for this options are detailed here: https://aka.ms/securitydefaults
Set notification email for admin A big downside of having separate admin users, is that all Microsoft communication and alerts are sent to your admin account without Exchange license attached. Luckily, for Azure AD specifically, you can set which email should receive the communication and alerts. On Azure AD, go to Notification Settings, set your preferences and fill in an email address which can actually receive emails. Personally, I like to send notifications to an email address which is not connected to the Office / Azure environment I’m trying to secure. And attacker with sufficient access right that accidently triggered an alert, can quickly delete emails from you mailbox. By having a separate email address which is not tied to the O365 instance you’re securing, this becomes way harder.
Exchange Online
Next up is Exchange. Since phishing is by far the most popular entry point in attacks, we’re not going to just accept the default settings. If you buy the Office 365 ATP, you have way more security for your email traffic, but that will be covered in the third part of this article. Here are the things which you can do in the basic Exchange Online to improve your security posture.
Blacklist malicious extensions By default, exchange blocks the most obvious extensions for attachments. However, Microsoft chose to not include the full list of malicious extensions but just a subset. I’m guessing this is because of usability as some people share some filetypes for legit purposes over email. Anyway, I’d recommend to disable everything that Microsoft has listed. In the Exchange Admin, go to Protection => Malware filters => Edit (default) policy => Settings => Common attachment types filter. Make sure it’s on (should be by default). Click on the + sign, select all the extensions in the new popup and add them to the filter.
Decrease attack surface for outlook OWA has by default a lot of features which are fairly unused. As I’d like to disable everything unused, I’d suggest to disable these features if your organization doesn’t use them. In the Exchange Admin, go to Permissions => Outlook Web Application => Click the pencil to edit the default policy => Features => scroll down and click “more options”. Now disable everything which you don’t use. I’ve disabled amongst others:
· Text messaging (who sends sms from OWA??)
· LinkedIn contact sync (this is why you should do ASR)
· Journaling (never seen this feature being used in Outlook)
· Inbox Rules (classic way to steal emails after a compromise)
· Email signatures (this prevents an attacker from modifying a signature with an image pointing to a malicious location that harvests NTLM creds)
· And a bunch more..
Next, on the same panel, go to “Offline Access” and set it to “Never”. Not sure what the point is of offline OWA.
More stringent spam rules Exchange Online allows you to mark certain mail as spam. I’d recommend to mark mails with non-standard HTML tags as spam. In Exchange Admin, go to Protection => Spam filter => Edit (default) policy => Advanced options. Now this is a balancing act. Choose wisely which emails you want to mark as spam and which not. All of these have legit use cases, but are also abused in the wild. In my setup, the following will be marked as spam:
· Numeric IP address in URL
· URL redirect to other port
· JavaScript or VBScript in HTML
· Frame or IFrame tags in HTML
· Object tags in HTML
· Embed tags in HTML
· Form tags in HTML
· Web bugs in HTML
Enable DKIM Good practices of all email is to enable DKIM. I’m not an expert on this topic, but I do know it’s recommended to set up and enable DKIM to increase mail security and decrease spam. Since we’re hardening, let’s enable it. In Exchange Admin, go to Protection => DKIM. Select your primary mail domain and click on Enable.
Enforce basic security policy on mobile Mobile access to Exchange is business critical in basically all organizations, so you have to enable that. However, to get a bit more control on how your users secure their mobile, you can enforce a policy from Exchange. Note that this only works in some cases and shouldn’t be relied upon. But enable it nevertheless as it does add some security. In the Exchange Admin, go to Mobile => Mobile Device Mailbox Policy => Edit (default) policy. Now, you have some choices to make. Do you want to only allow devices that comply? Then uncheck the box “Allow mobile devices that don’t fully support these policies to synchronize”. Next, click on security, review all settings and as you see fit for your organization. At a bare minimum, I would suggest to require a password of at least 4 or 6 numbers. Consider user impact before going all crazy on security.
Sharepoint
For SharePoint, I don’t have any new things to add, it’s just a repetition of some of the settings mentioned before, but now specifically for SharePoint/OneDrive.
Disable external sharing This has been mentioned a number of times before. Again, I’m not sure how the different settings influence each other, but I really want to prevent external sharing, so I’ve disabled it everywhere I could find :-). On the Sharepoint Admin, go to Policies => Sharing and set the two sliders for OneDrive and Sharepoint to “least permissive”.
Signout users on inactivity This option is fairly straightforward, although I’m not sure how it exactly works. Login on Sharepoint is just SSO from your main Microsoft account login. I’m not sure what sign-out implies if you’re still logged in on your Microsoft account. But suggest to just disable it in any case. On Sharepoint Admin, got to Policies => Access Control => Idle session sign-out and set the timing/settings to your taste.
Disabling Delve and bit more The Delve application somehow shows me all the documents where I and people in the same groups are working on. This is really not the type of info I want to see. And moreover, I don’t want to spoil an attacker with the most recent documents I’ve worked on to be shown in plain sight. So I’ve disabled this integration between Delve and SharePoint. On the Sharepoint Admin, go to Settings => Click on the link “classic settings page”. There, select:
· Disable Delve and related features
While at it, also set the following settings for bit more hardening of your SharePoint sites.
· Disable streaming video through Azure Media Services and disable the Video Portal
· Disable Personal Blogs
· Prevent users from running custom script on personal sites
· Prevent users from running custom script on self-service created sites
· Block SharePoint 2013 workflows
If you made it all the way here, thanks for reading. If you have any questions, feel free to reach out on Twitter or LinkedIn.
Knowledge center
Other articles

FalconFriday: Need for Speed: going underground with near-real-time (NRT) rules – 0xFF26
[dsm_breadcrumbs show_home_icon="off" separator_icon="K||divi||400" admin_label="Supreme Breadcrumbs" _builder_version="4.18.0" _module_preset="default" items_font="||||||||" items_text_color="rgba(255,255,255,0.6)" custom_css_main_element="color:...

How data science can boost your detection engineering maintenance and keep you from herding sheep
[dsm_breadcrumbs show_home_icon="off" separator_icon="K||divi||400" admin_label="Supreme Breadcrumbs" _builder_version="4.18.0" _module_preset="default" items_font="||||||||" items_text_color="rgba(255,255,255,0.6)" custom_css_main_element="color:...

Microsoft Defender for Endpoint Internal 0x06 – Custom Collection
[dsm_breadcrumbs show_home_icon="off" separator_icon="K||divi||400" admin_label="Supreme Breadcrumbs" _builder_version="4.18.0" _module_preset="default" items_font="||||||||" items_text_color="rgba(255,255,255,0.6)" custom_css_main_element="color:...

FalconForce realizes ambitions by working closely with its customers in a methodical manner, improving their security in the digital domain.
Energieweg 3
3542 DZ Utrecht
The Netherlands
FalconForce B.V.
[email protected]
(+31) 85 044 93 34
KVK 76682307
BTW NL860745314B01